

Welcome to The Recipe Corner, your new go-to spot for simple, delicious, and stress –free goodies straight from my kitchen to your phone screen. If you’ve happened upon this little piece of country cooking, then you may as well stay and learn how to make some Milk and Butter Biscuits.
Biscuits used to be one of those unicorns of a recipe that I just simply couldn’t make. I had tried every ingredient combination known to Me-Maws everywhere, and all I ever ended up with is a hockey puck that only the Raleigh Hurricanes could appreciate.
Though I had given up on this particular baking task and using frozen or canned biscuits seemed to be my only way to save face (thank goodness for Pillsbury), I hadn’t completely given up the hope that I would one day get it right.

A lovely lady named Brenda Gantt took Facebook by storm and shared her coveted Alabama born recipe, thus sparking my hockey puck interests once again.
*You can follow Ms. Gantt on her Facebook page ‘Cooking with Brenda Gantt’*
I would love to tell you that Ms. Gantt’s technique of shortening, buttermilk, and White Lily self-rising flour worked out just fine, but my Crisco hopes and dreams died right there in the cast iron when I pulled those lumps out of the oven.
There was a lot of good that came from this particular failure though, and her teachings showed me two things; I overworked my dough, and my use of all-purpose flour with salt, baking powder, etc. was just too many ingredients and required a simpler process for this type of art.
After thinking (and overthinking) about it, I decided to hit up a recipe I had seen once on a self-rising flour bag. After three pantry items and a little baking time, I finally ended up with the biscuits that I had imagined in my wildest middle-aged cooking daydreams.
Believe me, when you’re trying to throw together dinner in your 40s, Fabio on a white horse ain’t got nothing on a good plate of vittles.
I wondered if anyone else was going through the same trouble I was, so I decided that this week’s offering would be Milk and Butter Biscuits. I hope this helps you as much as it helped me.
And for all the granny’s out there who created this pastry perfection, God bless you!
Now, let’s get to the fun stuff.
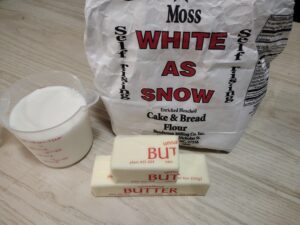 For this recipe you’re going to need two cups of self-rising flour, a stick and half of butter, and one cup of milk. You’re also going to need a medium-sized cast iron frying pan or a shallow Pyrex baking dish greased graciously with a bit more butter.
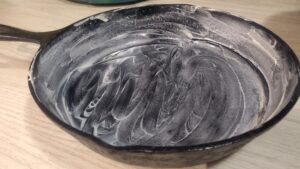 Don’t use non-stick cooking spray or olive oil to coat whatever you’re baking in. Our goal isn’t to keep the biscuits from sticking, but to brown the bottom of them with the same buttery goodness that’s going in them.
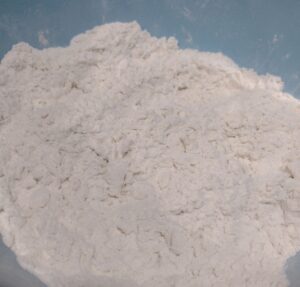
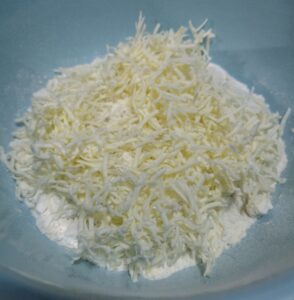 Start by preheating your oven to 425 degrees. In a large mixing bowl, add your two cups of flour and cut up one stick of the butter on top of the flour.
To make life a little easier, you can also use a cheese grater like I did to shred the butter. If you don’t have one, just a knife and cut it up into small cubes.
 Next, use your fingers to break up the butter into the flour. You’ll know it’s ready when the mixture starts looking grainy and has pea sized clumps throughout.
A pastry cutter works great when incorporating the butter, so if you have one, it will definitely save some time and work on those hands.
I guess this would be one of those moments of working smarter and not harder, but I’ve been known to have a hard head. This time was no different, and I also used my hands.
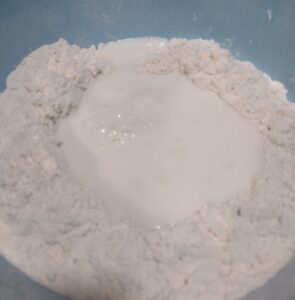 For the next step, make a well in the middle of your flour and butter mixture, and then pour you milk right in the center. Use a fork or cake spatula (or your hands) to start folding the flour into the milk and continue the process until a shaggy dough forms.
If your dough looks too dry and all the flour isn’t folding in, add more milk a tablespoon at the time. If it looks too wet and the dough isn’t forming, add in more flour bit by bit until it just does comes together.
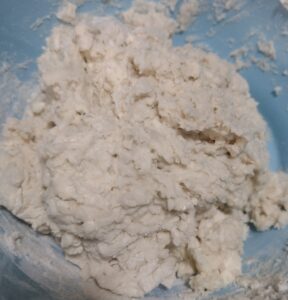
Turn the dough out onto a floured countertop or large piece of parchment paper. Lightly dust your hands and gently fold the pastry over and onto itself. Repeat the process three more times.
 This step builds those beautiful biscuit layers that we envied at Grandma’s dinner table.
DO NOT OVERWORK YOUR DOUGH.
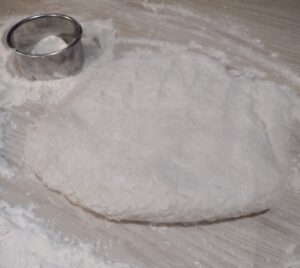
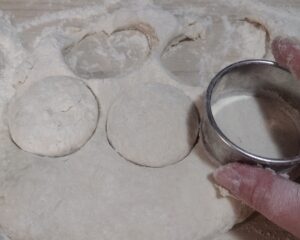 After the final fold, pat the dough out to about a 1/2-inch thickness. Dip a straight edge biscuit cutter or round glass into the flour and then press straight down into the pastry. Repeat the process after each cut and gently pull together and pat back out the scrapes to make additional biscuits.
Be sure not to twist your cutter. Twisting causes the edges to seal and makes the biscuit rise slanted as it bakes.
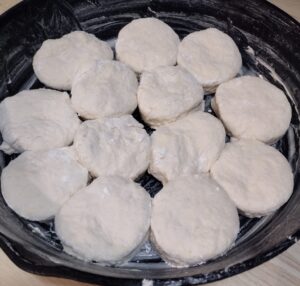 Grab your buttered pan and place the raw biscuits into it so that the edges are touching. Bake 10-12 minutes or until the tops are golden brown. Rotate your pan halfway through the baking process to ensure that they bake evenly.
Do you remember that half a stick of forgotten butter? Now is the underdog’s time to shine.
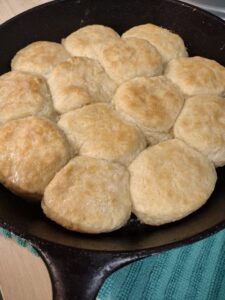 Melt that half stick in a bowl in the microwave. As soon as you pull your hot biscuits out of the oven, pour that butter all over the top. Let the pan cool for a few minutes on the counter, and the biscuits will soak up the extra butter.
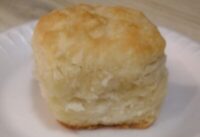
Altogether, I had three ingredients and 45 minutes invested in this recipe. These are beautiful, flaky, and tender, and they go great with any meal. They are a big hit at breakfast with some sausage gravy, or you can serve them on the side at supper time.
I should also mention that if you end up with left over biscuits (rare, but it does happen), you can throw them in the fridge and reheat them at 360 degrees in an air fryer. You can also wrap them in aluminum foil and throw them in a preheated oven with tomorrow night’s dinner.
Have your apron handy and be sure to check back in at The Recipe Corner each week. There’s bound to be something here that will have your kitchen smelling amazing, and the mama in you smacking hands away from a plate. See you next time!